SpeedJG - Installation
Because the SpeedJG GUI builder is entirely developed in Java it is executable on any operating system the Java runtime system (JRE 1.4.x or higher) is executable. And in order to optimally integrate this GUI builder into the operating system you use, you should make some adjustments we will describe within this installation chapter.
To run this program a Java runtime environment version 1.4.x or higher is required.
After downloading you can extract the obtained SpeedJG.zip file into a directory of your choice. If e.g. you have extracted the files to C:\SpeedJG we will refer to this directory as {SpeedJG-Home} in our further description. If you have extracted the files into a different directory, you have to take into account this {SpeedJG-Home} declaration accordingly. This home directory now contains a SpeedJG.jar file that holds all the classes you need to run the program.
For the first time just start the GUI builder with the following commands:
-
java -jar {SpeedJG-Home}/SpeedJG.jaror -
java -cp {SpeedJG-Home}/SpeedJG.jar SpeedJG
or simply change to the {SpeedJG-Home} directory and execute the
SpeedJG.bat (MS Windows) /
SpeedJG
(scrip Linux/Unix) file, that allows you to start the program with a
parameter defining the GUI project to be loaded initially
(e.g. SpeedJG Examples.gpr).
If you want to start the program from another directory than {SpeedJG-Home}, please open the script file with a text editor and edit the path to SpeedJG.jar accordingly:
SpeedJG.bat (MS Windows)
...
REM ========================================================
REM Setting the full path to the SpeedJG.jar file
REM recommended !!!
REM --------------------------------------------------------
REM Alter this entry to the path to SpeedJG.jar
    set SPH={SpeedJG-Home}\SpeedJG.jar
REM set SPH=C:\YOUR_PATH_TO\SpeedJG.jar
REM --------------------------------------------------------
...
SpeedJG (Linux/Unix)
...
# ==========================================================
# Setting the full path to the SpeedJG.jar file
# Alter this entry to the path to SpeedJG.jar
# ----------------------------------------------------------
  SPJ={SpeedJG-Home}/SpeedJG.jar
# SPJ=~/SpeedJG/SpeedJG.jar
# ----------------------------------------------------------
...
The command line syntax of this script file is:
SpeedJG
[MyGuiProject.gpr] [-cp
classpath]
Thus you can optionally define the SpeedJG GUI project file to be opened initially and / or a CLASSPATH that should be used by the GUI builder to look for resource files.
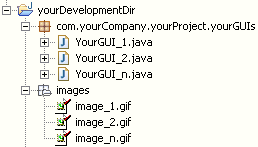
Starting from the hypothetical approach that you have a development
directory structure like the picture on the left, and you have set the
CLASSPATH within your IDE to yourDevelopmentDir
you should call the script file with the following parameter:
SpeedJG
[MyGuiProject.gpr]
-cp yourDevelopmentDir
This enables the GUI builder to scan the images you want to use in your GUI application from the CLASSPATH you have defined, and generate java
source code, that can be stored as .java file in your
com.yourCompany.yourProject.yourGUIs
directory. In other words: this synchronizes the CLASSPATH settings of your IDE with the settings of the GUI builder.
Copyright © 2003 Wöhrmann Softwareentwicklung - Munich Germany